Deploy React.js stack on Google Compute Engine
React.js is a web framework for user interfaces in Javascript. React popularity is growing and with its popularity also the number of available tools and their quality. Several applications can be found on Github to be used as a starting point for you own project. Few examples can be found, however, on how to set up your production environment given one of such boilerplates. In this post I’ll show you how to configure a Google Compute Engine VM to run the React.js stack. I will use the React Redux Universal Hot Example as it seemed to me one of the most complete. It involves an API server written in Express and a React.js application. See here for a complete list of tecnologies.
Creating a Compute Engine VM
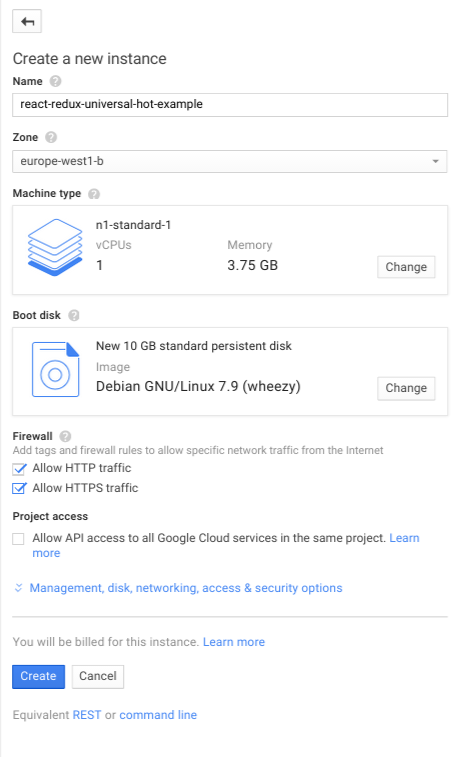
If you haven’t already, create your Compute Engine project. From the web console create a Debian GNU/Linux 7.9 “wheezy” VM of the preferred size in the preferred zone. Remember to allow HTTP and HTTPS traffic by ticking the corresponding options:

Installing git and Node.js
First of all, let’s install git. This is as simple as typing:
sudo apt-get install git
To install Node.js you have several options, you can either download linux binaries from here and put them into your path or compile the sources. Let’s try the hard way and compile Node.js from source:
sudo apt-get install g++ make
wget https://nodejs.org/dist/v0.12.7/node-v0.12.7.tar.gz
tar -xvf node-v0.12.7.tar.gz
cd node-v0.12.7
./configure
sudo make install
Notice that trying to compile any version more recent than 0.12.7
will fail as it requires a more up-to-date version of g++, not available
in Debian “wheezy” official repos. If you need a more recent version I recomment you
to download the pre-compiled binaries.
Clone and Build the Example
With Node.js installed we can finally clone and build our example:
cd ~
git clone https://github.com/erikras/react-redux-universal-hot-example.git
cd react-redux-universal-hot-example
npm install
npm run build
Now we could start the example with a simple PORT=8080 npm run start but this will
give us very little control on started processes. What happens if Node.js fails? Where
are the logs put? Lucky for us, forever comes to the rescue.
Managing Services with forever
forever allows to continuosly run Node.js applicatios and to start, restart, stop
them (and much much more). I recommend you to consult forever --help and discover by yourselves
what forever can do for you. Firstly, install it by running:
sudo npm install -g forever
We can then use it to start our API server on port 3030.
NODE_PATH=./src NODE_ENV=production APIPORT=3030 forever start ./bin/api.js
As well as our React.js application (on port 8080):
PORT=8080 NODE_PATH=./src NODE_ENV=production APIPORT=3030 forever start ./bin/server.js
You can get the list of running services with forever list.
Now our React.js application is up and running on port 8080. You won’t be able to see it
from the outside of you VM as port 8080 is closed (unless you opened it).
Running Node.js on port 80 is, in general, not a good idea. To avoid doing this
we use nginx.
Configuring nginx
We configure nginx to serve as a reverse proxy server: nginx will
listen to connections on port 80 and forward the traffic to our React.js app,
running on port 8080.
First, install nginx with:
sudo apt-get install nginx
Then create a configuration file for our React.js application:
sudo touch /etc/nginx/sites-available/react
Now edit that file and put the following configuration in it:
server {
    listen 80;
    server_name react;
    location / {
        proxy_pass http://127.0.0.1:8080;
    }
}
Before starting nginx we need to enable the configuration by putting it in
the sites-enabled directory (using a symlink):
sudo ln -s /etc/nginx/sites-available/react /etc/nginx/sites-enabled/react
And finally we start nginx:
sudo service start nginx
Your React application is up and running charmly in production, visit it at http://<your VM address>.
Now you can go on developing some cool stuff!
